How to Restore The Structure of Deleted EFI Partitions in Windows
In this article we will show how to manually restore accidentally deleted Windows 10 boot partitions in an UEFI system.
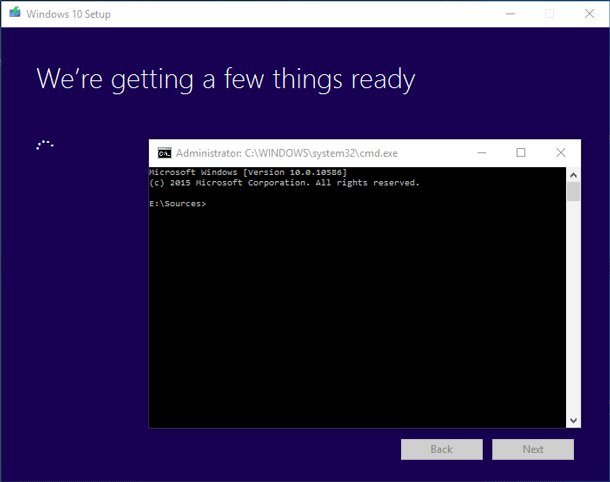
So, let us suppose that somehow, accidentally or not very accidentally, one of system partitions in an UEFI system was deleted, as a result of which Windows 10 cannot load any longer, being stuck in a cycle of suggesting to choose an insert boot media (Reboot and select proper boot device or insert boot media in selected).
Warning! This manual suggests management of disk partitions and is not meant for beginners. If commands are interpreted incorrectly, you can accidentally delete all data from your hard disk drive. We also strongly recommend backing up all your important data to a separate media.
Now we would like to remind you on how a partition table of a GPT-formatted boot hard disk drive should look like in an UEFI system. At least, there should be the following partitions:
- EFI system partition (ESP – EFI System Partition) – 100 Mb (partition type — EFI);
- Microsoft reserved partition – 128 Mb (partition type — MSR);
- Windows primary partition – the partition containing Windows.
This is exactly what we mean by saying minimal configuration. PC manufacturers or users can additionally create their own partitions which can contain, for example, Windows Recovery Environment (Windows RE), a partition with a reserved manufacturer’s system image (which allows restoring initial state of the computer), user-created partitions etc.
Advice. For installation of Windows 10 to computers with UEFI support you will need an authentic DVD or a specially created bootable flash drive.
As the system does not load correctly, we will need a Windows setup disk (or any other boot disk). So, now we boot from the setup disk and in the screen of beginning installation, press the key combination Shift+F10. There must appear a command prompt window:
Launch the disk and partition management utility:
Diskpart
Let us list the hard disk drives available in the system (in this example, there is one disk, disk 0. The asterisk (*) in Gpt column means that the disk uses the GPT partition table).
list disk
Choose this disk:
Select disk 0
Send the list of partitions to the screen:
List partition
In our example, there are only 2 partitions left in the system:
- MSR partition — 128 Mb;
- Windows system partition – 9 Gb.
As we can see now, EFI is absent (deleted).
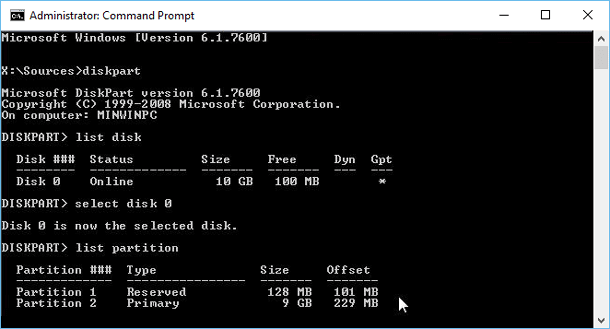
Our task is to delete the remaining MSR partition so that there should be at least 228 Mb virgin space left (for MSR and EFI partitions). The remaining partition can be deleted with the help of the graphic application GParted or directly from the command prompt (that is what we will do).
Important! At this moment, be most attentive and make sure you do not delete, by accident, the partition containing Windows or partitions with user data (if there are any).
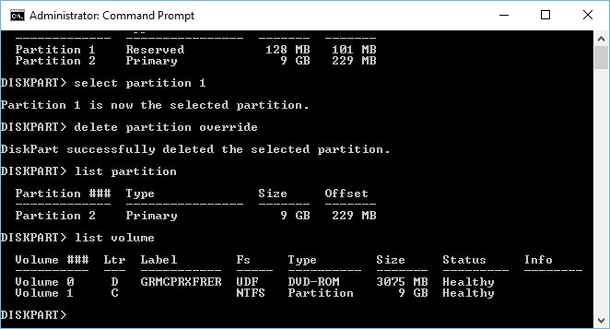
Then select a partition to delete:
Select partition 1
and delete it
Delete partition override
Make sure that the only partition left is that containing Windows
List partition
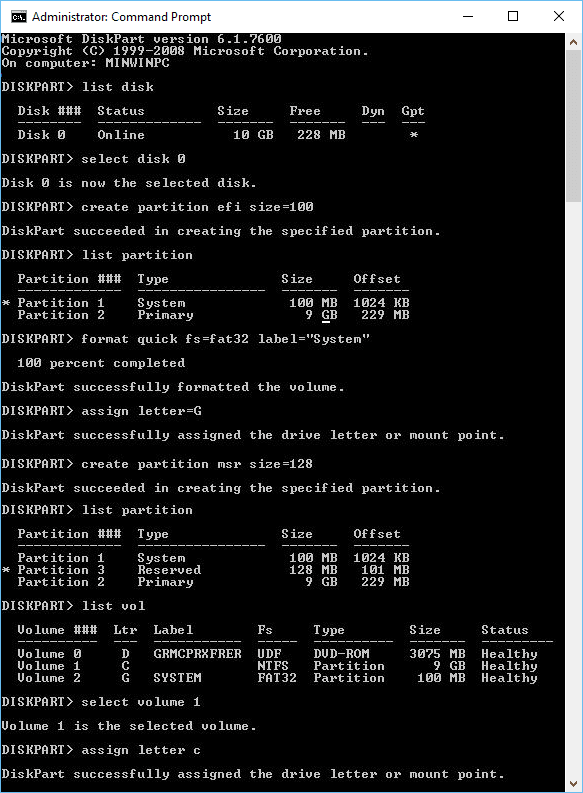
Now we can create the EFI and MSR partitions again, manually. In order to do so, perform the following commands one by one in diskpart utility:
Choose a disk
select disk 0
create partition efi size=100
Make sure that the 100 Mb partition is selected (asterisk)
list partition
select partition 1
format quick fs=fat32 label=”System”
assign letter=G
create partition msr size=128
list partition
list vol
In our case, the partition containing Windows has already been assigned the letter C:, if that is not correct, the assign a letter to the partition in the following way
select vol 1
assign letter=C
exit
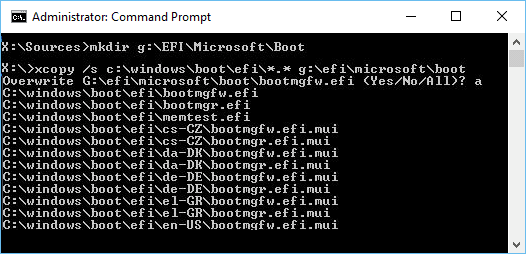
Copy files of the EFI environment from the directory where Windows 10 is installed:
mkdir G:\EFI\Microsoft\Boot
xcopy /s C:\Windows\Boot\EFI\*.* G:\EFI\Microsoft\Boot
Create again the configuration of Windows 10 boot loader:
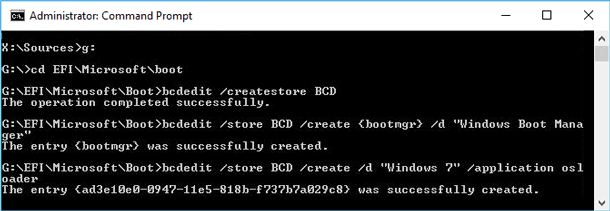
g:
cd EFI\Microsoft\Boot
bcdedit /createstore BCD
bcdedit /store BCD /create {bootmgr} /d “Windows Boot Manager”
bcdedit /store BCD /create /d “Windows 10” /application osloader
The command returns GUID of the created record, and in the following command this GUID should be inserted instead of {your_guid}:
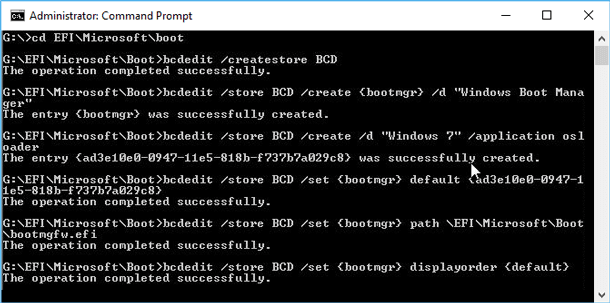
bcdedit /store BCD /set {bootmgr} default {your_guid}
bcdedit /store BCD /set {bootmgr} path \EFI\Microsoft\Boot\bootmgfw.efi
bcdedit /store BCD /set {bootmgr} displayorder {default}
Further commands are executed in the context {default}
bcdedit /store BCD /set {default} device partition=c:
bcdedit /store BCD /set {default} osdevice partition=c:
bcdedit /store BCD /set {default} path \Windows\System32\winload.efi
bcdedit /store BCD /set {default} systemroot \Windows
exit

Restart your computer … In our case, it did not load properly from the first time, so we had to do apply some IT quackery magic:
- Disconnect the power cord from the computer.
- Disconnect your hard disk drive (physically).
- Switch on the computer, wait until the boot error message window appears and switch it off again.
- Connect the hard disk drive.
Then in our case (we ran this test on VMWare virtual machine with UEFI environment) we had to add a new boot item into the menu by selecting the file EFI\Microsoft\Boot\bootmgrfw.efi in EFI partition.
After all described steps Windows 10 should load correctly. If you need to recover lost data from HDD use Hetman Partition recovery.
Source:
https://hetmanrecovery.com/recovery_news/how-to-restore-deleted-partitions-windows.htm